UnofficialBMW.com
Adding a Remote Trunk Release to a BMW E36 3-Series
ADDING A REMOTE
TRUNK
RELEASE
TO AN E36 3-SERIES
I have long wanted to add an electric trunk release to my 1996 318is
so that I could pop
the trunk from the front seat or by remote
control. I finally did after helping Ron Stygar add one to his
Z3M coupe. With a little planning, I added one to mine
without modifying the original
sheet metal and interior trim, or disturbing the trunk lock
mechanism.
My car came
with a convenient, console mounted, central locking switch
and my remote
control had an unused, second-stage unlock feature. Using one of
my Mini Automotive (MAC) Controllers, I extended the switch so that
it can also pop the trunk, and programmed the second stage unlock
to pop the
trunk and flash the hazard lights
(0.2M video).
What follows is my solution which likely won’t be everyone’s beer.
Consider it a series of suggestions and feel free to improve
and change things!
POPPING THE TRUNK
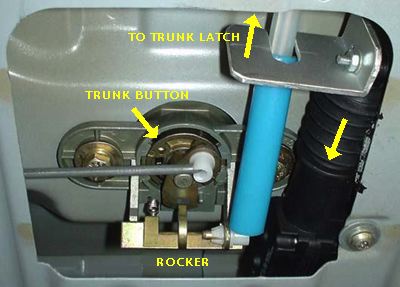 The stock, trunk
button ends with a broad, flat tab which the
central locking system orients through the long, horizontal rod, and a
motor
off the left side of the page. The system rotates the tab to six
o’clock
to enable the trunk button, and to three o’clock to decouple it.
The stock, trunk
button ends with a broad, flat tab which the
central locking system orients through the long, horizontal rod, and a
motor
off the left side of the page. The system rotates the tab to six
o’clock
to enable the trunk button, and to three o’clock to decouple it.
Here, the tab is at six o’clock to allow the trunk button to pop the
trunk. Pressing the button moves the tab in the
direction of your gut and tips the rocker. The rocker
pulls a long, steel rod that runs up to the trunk latch. It is just
visible inside the white tubing.
The rod tugs on the trunk latch (off the top of the page) and pops the
trunk.
I added the black, gun-style, linear actuator at the right,
an aluminum catch plate and the blue and white, nylon tubing, to
remotely pop the trunk. The
actuator
pulls down on the catch plate, the plate presses on the outer, blue
tubing, the tubing tips the rocker and the rocker tugs
on the long rod and trunk latch, popping the trunk. I slipped the
catch plate and blue, outer tubing over the white, inner tubing to
have metal slide over nylon and reduce friction.
Since it directly tips the rocker, pulsing the actuator always pops
the trunk – even when the trunk button has been mechanically decoupled
from the trunk latch. To prevent theft, I have
the MAC controller watch the trunk motor position switch and only pop
the trunk when it is unlocked (the tab is at six o’clock).
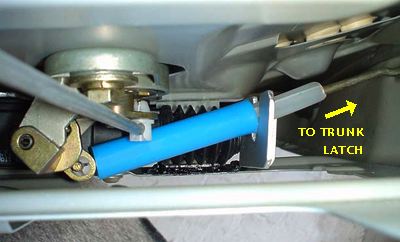
Here, you can see how the actuator, catch plate and tubing tip the
rocker, and how the rocker tugs the trunk latch rod rising off to
the right. A more traditional, cable-pull, trunk release might
have
been simpler, and I considered using one. Unfortunately, the coupe
trunk
lid has several, internal,
stiffening ribs and only about 12 cm (4.7 inches) clearance behind the
rocker. I couldn’t find a good spot to
mount a solenoid. I am not very mechanically inclined,
however!
Note how I slit the white tubing in this picture and the previous one.
More anon.
MOUNTING THE ACTUATOR
 I used the two empty holes
  in the trunk lid sheet metal at 3 and 5
o'clock from the rocker, to mount
the
actuator and keep it from twisting. The rear, 5 o'clock hole is some
distance
away, but perhaps that is just as well. The sheet metal below the rear
of the
actuator falls away and might have been a little trouble to fasten to
(probably just a little). The yellow
label warns
people not to
overtighten
the rear cap screw.
in the trunk lid sheet metal at 3 and 5
o'clock from the rocker, to mount
the
actuator and keep it from twisting. The rear, 5 o'clock hole is some
distance
away, but perhaps that is just as well. The sheet metal below the rear
of the
actuator falls away and might have been a little trouble to fasten to
(probably just a little). The yellow
label warns
people not to
overtighten
the rear cap screw.

To jump the
long, vertical rib that runs between the holes, I tied the top, rear
of the actuator to the rear hole through a bridge made from 2mm,
aluminum angle stock.
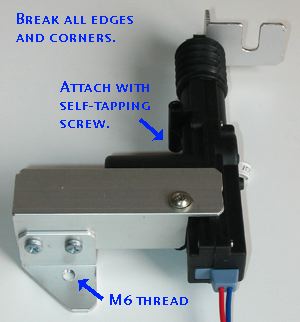
I tapped the mounting bridge foot to accept
an M6 screw and took off the foot’s
outer corner so that I could maneuver the actuator assembly inside the
trunk lid. I broke all corners and edges to avoid scratching the
inside.
The right edge of the
mounting foot ends up
next to the long, vertical rib.

I slotted a piece of 2mm angle stock and used it as a
catch plate. The slot lets the tubing sink as the actuator pulls at
an angle toward the rocker. (See the second picture at the top of
the page.) I beveled the slot edges to keep the plate from digging
into the tubing.
I cut an open slot and split the inner and outer
tubing (as you saw in the first two pictures) to slip the
tubing around the trunk latch rod, and
the actuator assembly over the tubing,
without disturbing the trunk lock mechanism.
ADDING AND WIRING THE ELECTRONICS
 I programmed one of my Mini Automotive (MAC) Controllers
to service the
hazard lights,
trunk release actuator, central locking switch and remote control,
second stage, unlock output. I arranged that:
I programmed one of my Mini Automotive (MAC) Controllers
to service the
hazard lights,
trunk release actuator, central locking switch and remote control,
second stage, unlock output. I arranged that:
- double-pressing the remote control unlock button unlocks the car,
flashes the hazard lights and pops the trunk,
- briefly pressing the central locking
switch locks and unlocks the car (as before), while
- pressing and
holding the
switch first unlocks the car and then pops the trunk.
Pressing and holding the switch is faster
and more convenient than reaching for another, near the hood release,
as you do on newer cars.
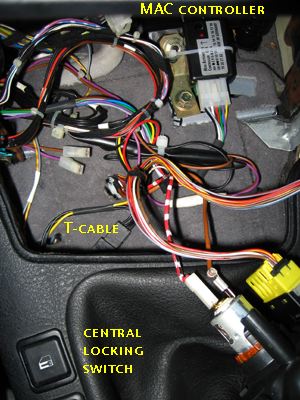
I installed the controller behind the middle console
and plugged it into the switch and the central module (ZKE) through a
T-cable.
As you can see, this was not my first project
behind the middle console.
The MAC controller draws power, monitors the switch and pulses the ZKE
central locking input through the T-cable at the top of the
schematic:
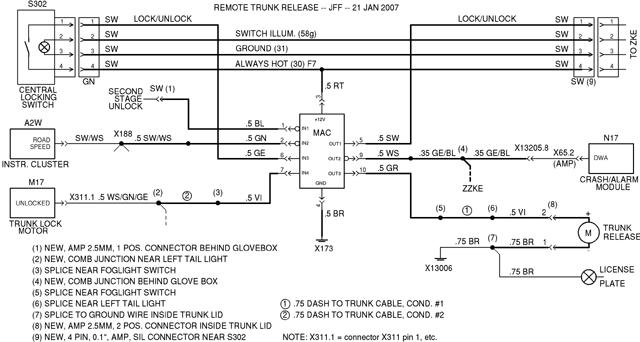
The controller
monitors the instrument cluster road speed signal (schematic, middle
left)
and
won’t pop the trunk while the car is moving, for example, on the
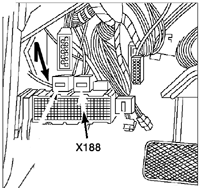
Autobahn. I tapped into the signal at comb terminal junction X188 in
the terminal block on the left wall of the
driver’s
footwell.
To prevent theft, the controller also monitors the trunk
unlocked signal (schematic,
lower
left) and won’t let the central locking switch pop
the trunk when it is locked.
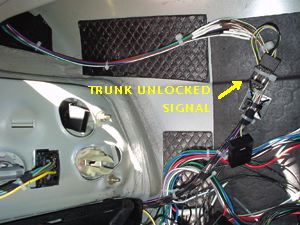
I tapped into the signal near the left,
rear tail light as I had already disassembled that corner to replace
the
trunk
to trunk lid cable. I had also laid some spare
circuits between the trunk and dash when I last pulled up the
carpet. If I hadn’t, I would have probably tapped in
behind the glovebox, near ZKE connector X13253,
pin 3.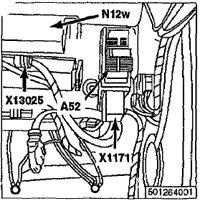
The controller pulses the trunk release actuator
(schematic, lower
right) over one of the circuits I had laid between the dash and
trunk, and a spare, violet wire I had added to the trunk to trunk lid
cable.
Finally, the controller flashes the hazard lights through the
BMW/Alpine alarm connector, X13025, behind the glovebox (schematic,
middle right). I added a comb terminal junction to the nearby terminal
block. I tied the controller to the junction and the junction to
X13025, pin 8 so that I can splice in other controllers (e.g. my
"ZZKE") and also have them flash the hazard lights.
CLOSING THOUGHTS
A remote trunk release is a greater
creature comfort than one might expect.
It is quite convenient to have a
single, central locking switch unlock the car, pop the trunk or
unlock the car and pop the
trunk. We plan to retrofit this nicety to
newer cars with harder to reach trunk releases.
Copyright © 2007 by John
Firestone