UnofficialBMW.com
Add a USB/AUX-IN Power Port Socket to a BMW E36 3-Series
ADD A
USB/AUX-IN POWER PORT TO A BMW E36 3-SERIES
 Just
how hard can it be to power portable electronics in an older BMW?
Pop a USB car charger in the cigarette lighter socket, plug in a
USB power cable, plug the cable into your device – and with that,
end this ridiculously short and simple story. Except that in
practice, the charger may not stay in and the cable may
interfere with the shifter and nearby controls.
Just
how hard can it be to power portable electronics in an older BMW?
Pop a USB car charger in the cigarette lighter socket, plug in a
USB power cable, plug the cable into your device – and with that,
end this ridiculously short and simple story. Except that in
practice, the charger may not stay in and the cable may
interfere with the shifter and nearby controls.
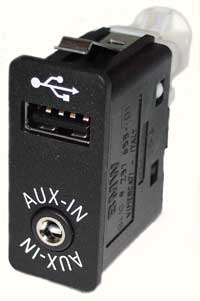
To avoid these issues, folks have installed a USB power socket
elsewhere – for example, in the glovebox or between the front
seats – and hard-wired a USB charger into the car. Newer BMWs can
come with built-in USB sockets, some of which fit an old E36 quite
well. In particular, the USB/AUX-IN socket from the E90 3-Series
fits into the switch cutouts in front of the shifter. In the most
passenger-side cutout, it fits without the USB cable getting in
the way.
Here, I first briefly outline how I added a E90 USB/AUX-IN socket
to my 1996 318is. I then go into the details and suggest some
alternatives. The mod needs few parts, but
there is perhaps more to choosing and installing them than one
might suppose. What follows is just one man’s solution. Feel free to
change and improve it to meet your needs and tastes.
SOME SUGGESTED MATERIALS
Quantity
|
Item
|
1
|
E90 USB/AUX-IN socket, BMW 84 10 9
237 653
|
1
|
USB adapter wiring cable, BMW 61 12 9 255
716
|
1
|
Suitable
USB car charger
|
1
|
12V power socket, BMW 61 34 6 973 037 (for
the car charger)
|
2
|
1/4 inch (6.35 mm) female spade terminals
(for the 12V power socket)
|
1
|
7.5m fleece wrapping tape, BMW 61 13 6 920
760 (to prevent rattles)
|
50 mm /
2 inches
|
10x25x10 mm o.d. (0.5x1.0x0.5 inch)
aluminum 5xxx/6xxx u-channel,
e.g., McMaster-Carr 9001K26 (to shim the USB/AUX-IN
socket)
|
To get 12V power from the U.S. cellular
phone prewiring:
Quantity
|
Item
|
1
|
black, 8-pin AMP 2.5 mm2
plug housing, BMW 61 13 1 378 116 |
| 2 |
AMP 2.5 mm2 pin
contacts, BMW 61 13 1 376 191 |
To get 12V power from a comb terminal
block:
Quantity
|
Item
|
2+2*
|
flat, comb terminal contacts for
0.35–0.5 mm2 wire, BMW 61 13 1 387
140, or for 0.75–1.0
mm2 wire, BMW 61 13 1 387
142 |
| 1* |
17-position, breakable comb
terminal, BMW 61 13 1 387 150 |
1*
|
comb terminal insulating sleeve,
5-position, BMW 61 13 1 393 719, or
9-position, BMW 61 13 1 393 721 |
*
Only needed to add and daisy chain to a new comb upon filling an
existing one.
To wire the
AUX-IN jack:
Quantity
|
Item
|
1
|
4-pin, uncoded AMP plug
housing, BMW
61 13 8 380 696 |
| 3 |
Tin MQS socket contacts with 0.5 mm2 wires, BMW
61 13 0 005 197, or bare contacts for 0.35–0.5 mm2
wire, BMW 12 52 7 502 039 |
PROCEDURE
It always safest to disconnect the battery before doing electrical
work. My installation went as follows.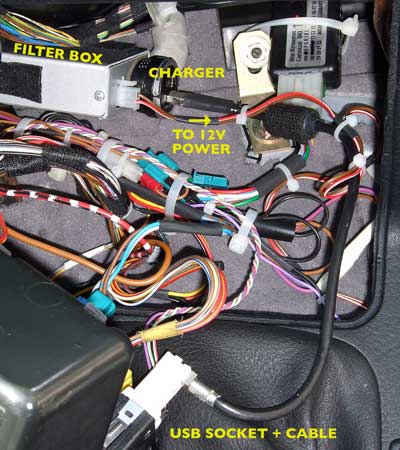
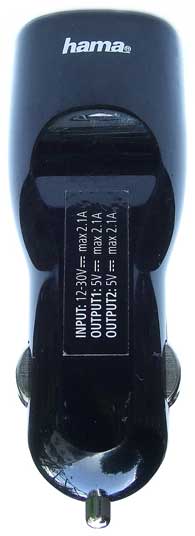
- Choose a USB car
charger I went with a German-designed Wicked
Chili 22W USB car charger to power my devices. It can supply up
to 2x2.1A to two Apple products, draws under 5 mA on standby and
stays put in various BMW 12V sockets. It is also looks very much
like the chargers BMW sells: Wicked Chili may very well be their
supplier.
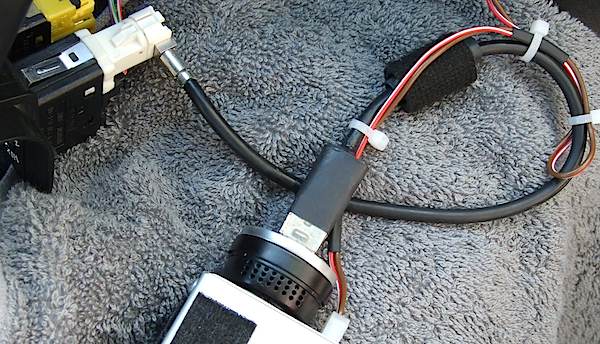
- Mount the USB
charger I designed and built a filter box that
blocks any surges and transients (outside 0–30V) that might
damage the charger and its load. I included a 12V power socket
to take the charger, applied fleece tape to the box to soften
edges and prevent rattles, then nestled the box with charger
below the middle console, forward of the shifter. Finally, I
surrounding the filter box with foam (not shown) to keep it from
moving.
- Get 12V power
for the USB charger I took unswitched 12V
power from the cellular phone connector under the middle console
alongside the parking brake lever. I used the matching BMW/AMP
2.5 mm2 plug and contacts to make a
plug-and-play harness, and plugged in the filter box.
- Simplify
the AUX-IN jack, if necessary I isolated the
two capacitors inside the AUX-IN socket, to use the stereo jack
as an RS-232 data port.
- Place the USB/AUX-IN
socket I put the socket in the rightmost,
middle console switch cutout with the USB socket forward: to
route the BMW adapter cable away from obstacles below the
socket, to distance the charging cable from the shifter, and to
show the USB icon as you insert a plug.
- Connect the
USB/AUX-IN socket to the charger I cut the tan
plug off the BMW adapter cable, replaced it with a USB type A
plug, and moved the cable’s ferrite bead toward the type A plug.
I routed and double-backed the cable from the console socket to
the charger: to provide slack when you pull out the switch
panel.
CHOOSING
A USB CAR CHARGER
 To get 5V power for your portable
devices, you will need some sort of USB car charger. The USB power
port standards, both official and proprietary, have become
sufficiently diverse that is probably better to purchase a charger
rather than roll your own. Since models come and go, I will just
discuss some things I considered.
To get 5V power for your portable
devices, you will need some sort of USB car charger. The USB power
port standards, both official and proprietary, have become
sufficiently diverse that is probably better to purchase a charger
rather than roll your own. Since models come and go, I will just
discuss some things I considered.
Even the most costly USB car chargers are inexpensive compared to
some of the devices they may power. Some of the cheaper ones lack
overvoltage protection and can pass through 12V when they fail. I
sought a charger with overvoltage protection that will operate at
12 or 24V. A 12V-only charger specified up to 16–18V may not
withstand the greater overvoltages possible in an older car. I
only considered a charger’s price, to reject it, if its price was
much lower than average.
The current lot (as of Summer 2014) generally top out at 2.1 or
2.4A per USB socket, for quickly charging tablet computers. One
common type has two USB jacks: one marked “Apple” to charge Apple
devices at up to 2.1A, and the other often marked “Android” to
charge everything else at up to 1.0A. Some chargers support just
one set of standards, for example, Apple’s or Samsung’s, and may
slowly charge anything else. Using a special, charge-only USB
cable, however, will often restore full charging rates.
I considered several, universal, “intelligent” or “smart” chargers
that can quickly charge any device plugged into any jack. These
recognize and signal the device over the USB data lines, and try
to supply the maximum current it can draw. A Texas Instruments
design note, PMP7389,
explains how that can be done. I could not find a smart charger
that met all my needs, and decided to wait for the next
generation. Instead, I bought a charger meant for Apple devices,
along with a charge-only USB cable to quickly charge an Android
phone.
I chose a USB car charger with two USB sockets (2x2.1A) and only
use one. Car chargers tend to be densely packed and have less than
ideal ventilation. Drawing power from just one socket causes only
a fraction of the internal heating the charger is designed for.
This should help extend its life.
I checked if a charger might disturb the car’s radio
reception. Quite a few manufacturers certify their chargers
meet CE and FCC regulations, but otherwise simply ignore them –
with predictable and noisy results.
I also researched a charger’s standby current drain since I wished
to have it always on. The five chargers I sampled drew from 4 to
11 mA when idle, which is no worse than a typical car alarm.
Finally, I confirmed that a charger fit snugly in a 12V power
socket and would not wiggle out, as I explore in the next section.
MOUNTING THE USB CAR
CHARGER
It is probably worth socketing the USB car charger, if you can, to
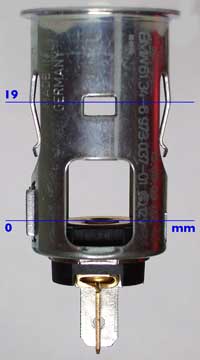
make it easy to replace with the latest and greatest. The current
BMW 12V power socket (at the left) is only 25 mm
(1 inch) in diameter and bonds very well with MMA adhesive.
The socket is a pretty good deal, at the current price of about 3
euros or 4 dollars, for a product its German maker has been
refining for generations.
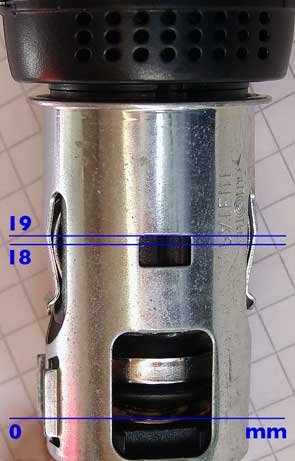
The socket has side grippers apexing outward, 19 mm from the
socket base. This matches the side springs on some but far from
all USB car chargers.
The companion, 12V "CABLE SOCKET FEMALE" contacts, BMW p/n
61 13 1 362 868, are less cost effective. They
are just uninsulated, 1/4 inch (6.35 mm), female spade
terminals sold in strips of five.
Unfortunately, as of Summer 2014, there are no standard
dimensions for a 12V cigarette lighter socket. I collected five
chargers, and as you can see, the five have four different notions
of where a socket can expect their side springs. The two at the
far left snugly match the side grippers of the BMW socket at
19 mm from the base; the second picture shows the leftmost
adapter even has a millimeter to spare. The two adapters may fit
because they are German designs plugged into a German original
equipment socket. The BMW USB Charger, p/n
65 41 2 311 598, looks very much like the
leftmost, Wicked Chili charger and may fit as well.
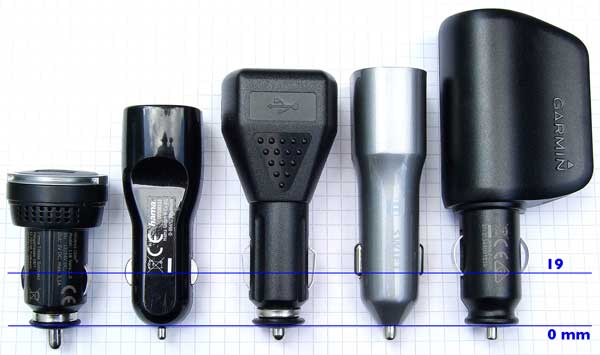
The third charger from the left could probably be made to snap in,
by adding a small bump of quick setting, possibly electrically
conductive epoxy to each spring. If a charger will not stay put –
despite tape, heat shrink, cable ties or other contrivances – you
can always take it apart and solder wires directly to its circuit
board. Fixing the wires in place with heat shrink or adhesive will
keep vibration from breaking them at the solder joints.
GETTING 12V
POWER FOR THE USB CAR CHARGER
The USB charging adapter needs a source of safe, switched or
unswitched 12V power.
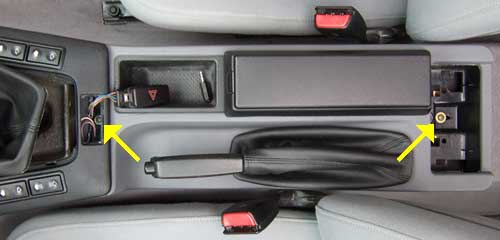
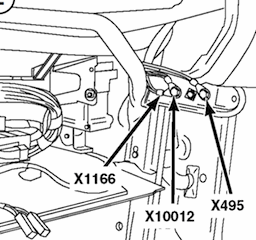
If you have a U.S. 1995+ MY car with
prewiring for a cellular phone, you can use original parts and plug into
the convenient, black, cell phone connector, X13305, within the
center console alongside the parking brake handle. To remove the
rear center console piece, first remove the two screws, one under
the emergency flasher button and the other under the rear cubby or
ash tray.

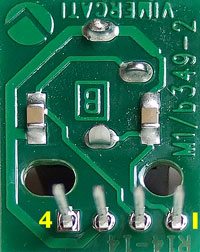
The cell phone power connector is wired are as follows:
Pin
|
Wire Color
|
Connection |
1
|
0.75 mm2 RT/WS (red with
white stripe) |
constant 12V (fuse 33, 10A) |
2
|
0.75 mm2 BR (brown) |
ground |
5
|
0.5 mm2 VI/WS (violet with
white stripe) |
switched 12V, on in acc./run/start (fuse
43, 5A) |
A wire to pin 1 and its complement to pin 2 should be 0.5 mm2
(24 AWG) or larger, so that fuse 33 can protect them.
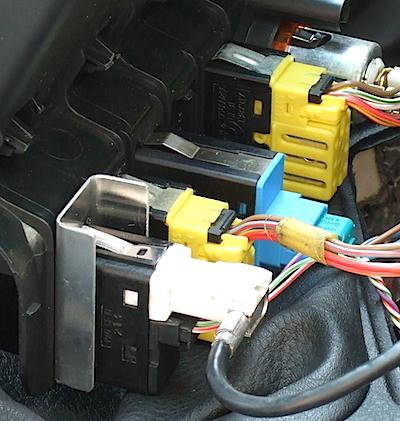
If your car was not prewired
for a later U.S. cellular phone, you can use original parts and tap into
the comb terminal splice block behind the glovebox. The splice
block, once you get to it, is one of the easier to work on.
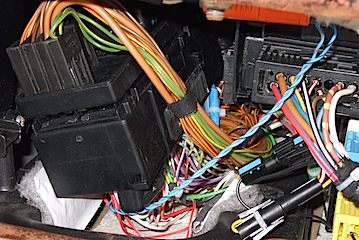
The left picture shows the two comb terminals and wire colors that
can provide 12V power:
Comb Terminal
|
Wire Color
|
Connection
|
X481
|
0.75 mm2 RT/WS
wires (red with white stripe) |
constant 12V (fuse 33,
10A)
|
X1235
|
0.75 mm2 VI/WS
wires (violet with white stripe) |
switched 12V, on in
acc./run/start (fuse 43, 5A)
|
The right picture points to the three M6 bolts behind the dash near
the passenger door that can provide ground. A wire to X481 and its
complement to ground should be 0.5 mm2 (24 AWG)
or larger, so that fuse 33 can protect them. Try to add wires with
the same colors and similar sizes since they identify the terminal.
You could use a white paint marker to stripe a solid colored wire.
SIMPLIFYING
AND WIRING THE AUX-IN JACK
Should you wish to use it, the four-pin socket behind the
1/8 inch (3.5 mm) AUX-IN stereo jack is wired as follows:
Pin
|
Connection
|
1
|
tip
|
2
|
ring |
3
|
sleeve
|
4
|
PCB shield layer (often
unconnected)
|
Inside the jack assembly, two 100 nF SMD capacitors, between pins 1
and 3, and 2 and 3, filter out radio frequency noise from a low
impedance (1–50Ω) headphone signal. You may need to remove or
isolate the capacitors to carry data or higher impedance audio
signals.
PLACING THE USB/AUX-IN
SOCKET
The
USB/AUX-IN socket closely fits the switch cutouts in front of the
shifter, both side to side and front to back. Take care. Once a
socket is in, it wants to stay in. I have to use a slip-joint water
pump pliers to get one out.
As you can and will see, neighboring switches and wiring, and the
foam around the shift lever, limit the viable cutouts. BMW sells USB
adapter cables that exit in other directions. They may allow other
placements, but some cables are expensive.
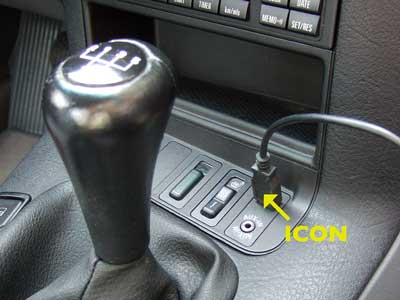
The cutouts nearest the driver may also put a topside cable too
close to the shifter or in front of a switch or display. I placed
the socket in the rightmost cutout (of my left hand drive car) and
doubled-backed the bottom side, BMW adapter cable: to leave enough
slack to pull out the switch panel toward the driver's seat (as in this earlier picture).
Per the USB 2.0 Standard, §6.5.1, USB “receptacles should be
oriented to allow the Icon on the plug to be visible during the
mating process.” Placing the AUX-IN jack toward the shifter, as
shown, makes the plug icon visible.
The USB/AUX-IN
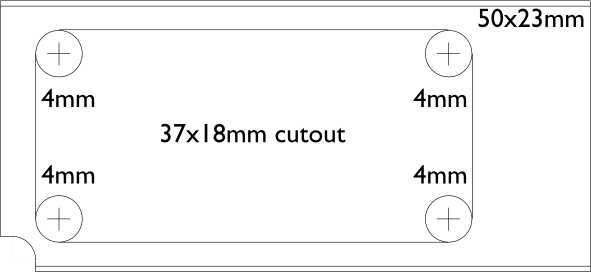
socket expects a 37.5x18x4 mm (LxWxD) cutout that is longer
and deeper than the 37x18x2 mm cutouts in the E36. You can
modestly rock a mounted socket, side to side, but the play is not
bad and easily addressed by pushing on the socket panel as you
unplug a cable. Thickening the switch panel by 1–2 mm will
stabilize the socket; 1.5 mm (1/16 inch) would be idea.
A couple ABS or ABS/PC strips opposite its side springs may work,
however, the stiff springs may overtax the plastic when inserting
and removing the socket.
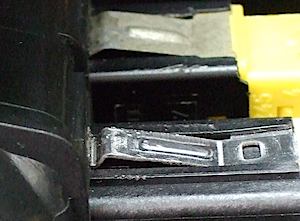
A more robust solution, which will back the switch panel, is to
push a one-piece metal shim on to the back of the mounted socket.
The shim can be a short length of u-channel, slotted to slide on
to the socket and side springs, and notched to clear the nearby
panel edge clip. I drilled, nibbled and filed 50 mm of
aluminum 5754, starting from the template linked below. The template
should work for the first, third and fifth switch cutouts. The
shims’s rounded steps and corners reduce stress concentrations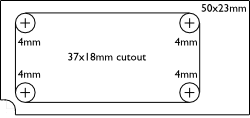 .
.
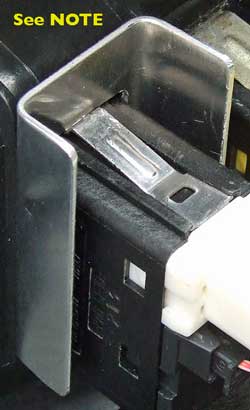
NOTE: The sharp eyed reader will notice that I used
1 mm u-channel: 1.5 mm (1/16 inch) would have been
better and will give a snugger fit; 2 mm channel may be too
tight.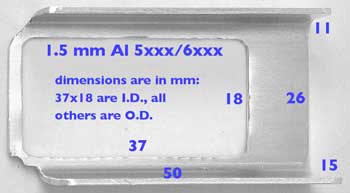
A shim may make the
socket harder to remove. Fortunately, you can change both the USB
and AUX-IN subassemblies from the back of a mounted socket –
provided the u-channel is not too high. Ideally, it should be no
higher than about 15 mm (0.6 inches), to fully expose the
subassembly retaining bumps.
CONNECTING THE
USB/AUX-IN SOCKET TO THE CHARGER

I cut the tan HSD plug off the BMW adapter cable and soldered on
a USB standard type A plug. The cable was just thin enough to
fit into the metal USB connector shell. Other BMW USB adapter
cables may be too thick. The cable’s wire colors are as follows:
USB Pin
|
BMW Wire Color
|
Signal
|
1
|
orange
|
VCC |
2
|
green
|
D– |
3
|
blue
|
D+
|
4
|
brown
|
GND |
The cable is equivalent to Rosenberger HSD cable assembly
LD5-224-0850-B-F,
with
Dacar
535, 4x0.14 mm
2 (26 AWG), PP-insulated
wires in a -40 to 105 °C PVC jacket. An internal wire pair
can carry up to 3.7A at 85 °C and will drop 0.25V at 2.1A
over the full 85 cm of cable. You may need a shortened
cable for high currents. I cut mine to about 30 cm
(12 inches) long.
I potted the thin, metal connector shell in epoxy to keep the
shell together and the cable from pulling out. I removed the
fleece tape and molded plastic around the ferrite bead to loosen
it. I slid the bead away from the white HSD plug, to make the
console end more bendable, and placed the bead near the type A
plug, to further reduce any RFI from the USB car charger. I
re-insulated the bead with heat shrink and the still fresh
fleece tape: to protect the bead and prevent rattles.
If soldering USB plugs is not your beer, you can cut off the tan
HSD plug and splice on the A-plug end of a standard USB cable.
The wiring is not critical since the USB data signals do not
change. The two, outer pin USB power wires, however, should be
24 AWG or larger if a device will draw much current over a
long cable. Otherwise, the cable may drop too much voltage and
reduce the available current. A USB cable is often marked with
its conductor sizes. Something like “28AWG/1P AND 24AWG/2C”
translates to: one 28 AWG data pair and two 24 AWG
power conductors. A cable with just “28AWG” means all the wires
are that small.
The wire colors of a
standard USB cable and the BMW
adapter cable (LD5-224 cable) should match up as follows:
USB Pin
|
USB Wire Color
|
BMW Wire Color
|
Signal
|
1
|
red
|
orange
|
VCC
|
2
|
white
|
green
|
D–
|
3
|
green
|
blue
|
D+
|
4
|
black
|
brown |
GND
|
Please note that some USB cables may use other colors, so
check them against the USB pins.
Copyright
© 2014 by John Firestone
 .
.