|
Home
E12
E24
E28
E30
E34
E36
Z3
E39
E46
X5/E53
ALL
Ron Stygar
Carl Buckland
Dale Beuning
Forums
Help

Subject: 95 E36 M3 Stereo upgrade
Warning:  This is a work in progress, it's only about 30% written
          but I thought I'd go ahead and put it up here anyway.
          Dale
I finally purchased and installed an upgraded stereo for my '95 M3.
Here's what I did:
The components I chose:
- a/d/s/ P640 amplifier, 6 channels at 40 watts/channel, builtin xovers $479
- a/d/s/ AL5 speakers, 1" tweeter and 5-1/4" midrange-woofer, $279
- Toby Pistol, 8" subwoofer in bandpass box $270 carpeted to match the trunk
- I kept the rear factory (Noika) speakers
- I kept the factory (Alpine) deck and 6-disk CD changer as I like
their performance and how integrated they look to the car.
Installing the _AL5_ front speakers
Removing the front door panels:
Remove the plugs hiding the Torx screws under the interior door handle.
Remove Torx screws.
Brace the lower metal of the door with your foot and pull on the door panel
with one hand in each cubby hole. Or you can use both hands in one cubby hole
and work you way along the bottom. I used the second way and ripped
the front plastic cubby off of the door panel. I was able to glue it back
on fortunately. Then just work your way around the edges of the door
pulling the clips loose. It slides up off the top of the door. It
helps to have your window all the way down before starting this.
Now pull the wires off your side mirror adjustment switch and the speakers.
Be sure to note which speakers wires go where.
Removing the factory tweeters:
The factory tweeters and midrange speakers are held on by a ring from the
back that you unscrew to loosen. Just that simple.
Installing the tweeters:
Take a small diagonal cutters and cut little 1/2"
cuts around the circumference of the tweeter hole, that way the 1" a/d/s/
recessed tweeter mount would fit the hole. The stock tweeter has a 1/2"
lip all the way around, so it will still fit the same hole and cover up
my modification.
Reinstalling the front door panel:
Removing the kickpanel and misc(drivers side):
Removing the kickpanel and misc(passenger side):
Installing the midrange-woofers:
Reinstalling the kickpanel and misc(drivers side):
Reinstalling the kickpanel and misc(passenger side):
Installing the crossover networks:
(see wiring the front speakers below)
Removing rear speakers
Installing the _P640_ amp
- Prep:
- First I had to take the trunk apart. Out came the trunk floor carpet,
the plastic floor panel on the drivers side (2 10mm plastic nuts), both rear
taillight housing covers and the drivers side rear speaker. The drivers side rear speaker needs to be removed in order to get the mouse-fur off the drivers side of the trunk.
- Now the stock amp is exposed, go ahead and pull it and it's mounting brackets
off with a 10mm socket. When you disconnect the wires, look on the connector,
they are each a different style and you'll need to be able to tell them
apart in order to make sense of the wiring diagram.
- Wire:
I used the stock speaker wire to power the front and rear speakers,
and Monster Cable 14AWG for the subwoofer. I also used a stranded 8AWG
red color power wire run from the battery with a 30AMP fuse inline
less then a foot from the battery. My ground wire is a 10AWG and green.
It's runs from the amp to a good ground below the drivers side taillight.
- Mounting:
I mounted my P640 along the side of my trunk wall on the drivers side
between the taillight and the rear wheel. I had to cut a 1/2" thick piece
of wood to create a mounting spot for it. I may be moving the amp to
the under side of the rear shelf. If I do, it will be mounted with the
fins pointing up using spacers to leave 1" of clearance above the fins.
- Amp Configuration:
My amp is configured to run channels 1&2 into the front speakers crossover
network at a crossover point of 85hz. Channels 3&4 run to the rear speakers
also crossed over at 85hz. Channels 5&6 are bridged to output 120watts mono
into the subwoofer, and naturally it's crossover starts at 85hz and
goes down from there.
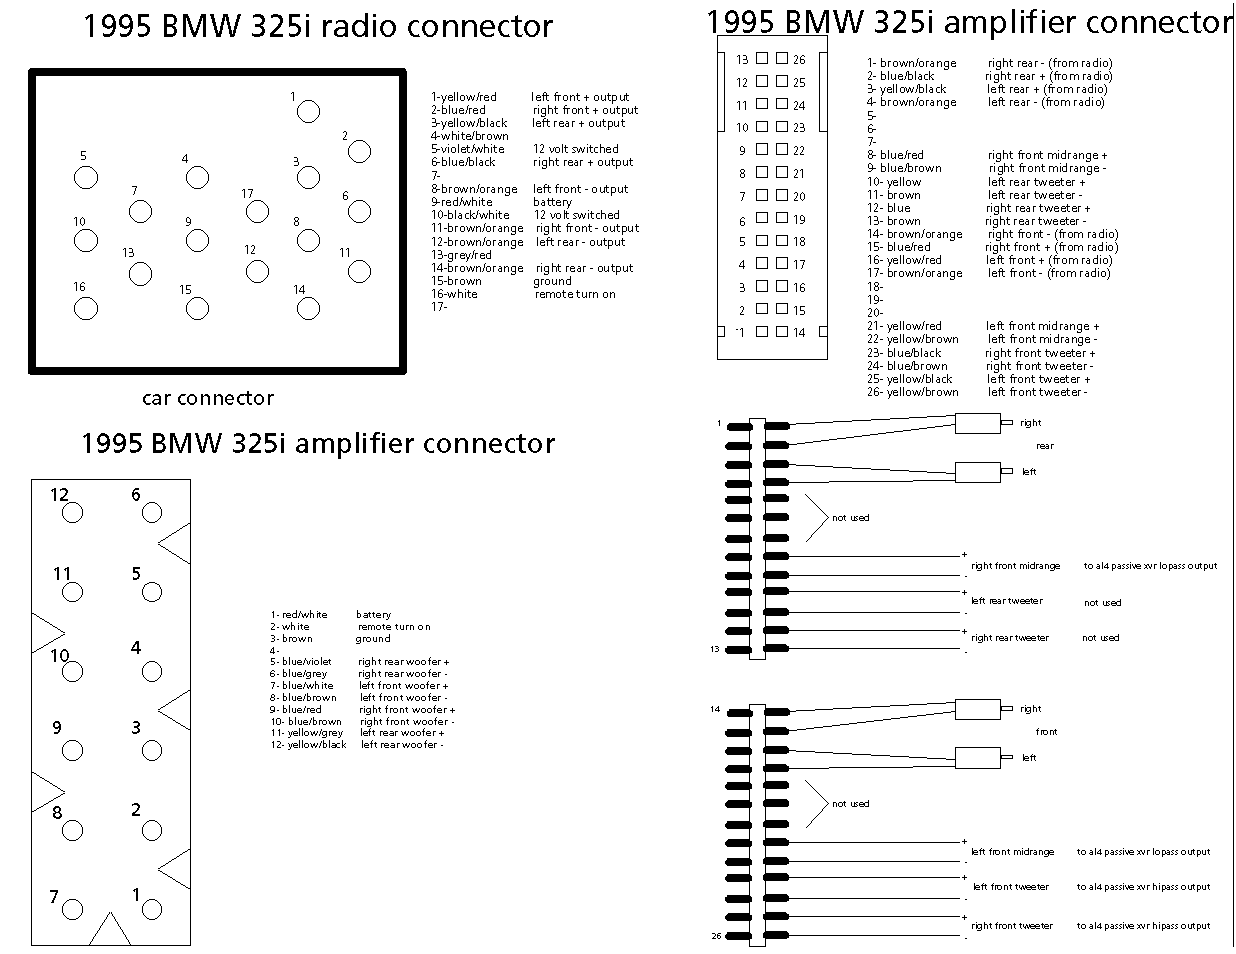
See the factory stereo pinouts:
Wiring the amp:
- Input:
- Power
I used a stranded 8AWG red color power wire run from the battery
under the rear deck with a 30AMP fuse inline less then a foot from the battery.
- Ground
My ground wire is a 10AWG and green. It's runs from the amp to a good
ground below the drivers side taillight.
- Remote turn on
The white #2 wire from the 12pin amp connector is used to turn the amp on.
- Stereo signal
- Following the instructions in the a/d/s/ P640 manual, I
wired the decks speaker level outputs to set of RCA cables for
input to the amp. Easy installation, but I had an alternater
whine. So this method didn't work for me.
- I talked to the local Kustom Kar Sound installer, he recommended
and sold me on a pair of line level converters. $20 each.
Installed in 20 minutes, WHINE IS GONE and I'm a happy camper.
- Output
- Front speakers
- I hooked Channels 1&2 to the inputs of the crossovers supplied with the
AL5 speakers.
- Front Right Tweets attach to (blue/black +) and (blue/brown -)
- Front Left Tweets attach to (yellow/black +) and (yellow/brown -)
- Front Right Woofers attach to (blue/red +) and (blue/brown -)
- Front Left Woofers attach to (blue/white +) and (blue/brown -)
- Rear speakers
- Rear Right Tweets attach to (blue/black +) and (blue/brown -)
- Rear Left Tweets attach to (yellow/black +) and (yellow/brown -)
- Rear Right Woofers attach to (blue/violet +) and (blue/grey -)
- Rear Left Woofers attach to (yellow/gray +) and (yellow/black -)
- Subwoofer
- Channels 5&6 from the a/d/s/ P640 amp are bridged mono, so the
output of both of these channels
goes to the Toby Pistol subwoofer.
The amp puts out 120watts in bridged mode, plenty of power for this sub.
Tuning the system
Properly adjusting your gain controls:
Setting your crossover points properly:
Configuring your fader to act as a subwoofer level control:
Dale "rockin' down the highway" Beuning
'95 M3
|