|
Ron Stygar Carl Buckland Dale Beuning Forums Help
From: RonStygar_at_aol.com From RonStygar_at_aol.com 
Parts used:
                  BMP/VDO gauge panel assembly ~$370.00
                  14 and 16 gauge full mtw or thwn or thnn or gasoline and
		  oil resistant wire in various colors
                  NAPA Part 784233 Connectors for oil pressure sending unit
		  $0.94 /package
                  NAPA Part 784234 Connector for ground wire going to left of
		  dash stud $0.94/package
                  NAPA Part 784217 Connector tap-in 18-14 gauge $0.94/package
                  NAPA Part 784307 Connector insulated female tab for gauge
		  daisy chain and oil temperature sending unit 16-14 gauge
		  $0.94/package
                  NAPA Part 784295 Connector insulated female tab with male
		  tab for gauge daisy chain 16-14
                  gauge $0.94/package
                  NAPA Part 726162 Tie-wraps 4 inch $6.60/package of 100
                  NAPA Part 726129 Tie-wraps 5.5 inch $6.28/package of 25

                  The above is just a reference. MCM 1-800-543-4330 (call for
		  a free catalog) and Radio Shack are other places to look.

                  (NM x 0.737 = ft-lb)
Based on comments from the digest I elected to purchase the E36 3 gauge panel with oil pressure, temperature and voltmeter gauges from BMP design 1-800-648-7278 for ~$370.00. The gauge panel alone is $200.00, $150.00 if you buy the gauges from them as well. This is a quality piece. The panel is supposedly made by the same company that makes the original BMW panels. From the quality of the panel, I would say this is true. When done, if you pay attention to detail, it looks like it was done by BMW. The system comes with everything required except the wire and associated Stakon type connectors etc. I also elected to install it myself to control the quality. This appears to be a monumental task, but in my opinion, although taking a lot of time, it is a piece of cake. Then again I've been doing this kind of stuff for many years. The hardest part was finding a path and routing the two sending unit wires to and within the engine compartment. If your uncomfortable with any part of this guide, don't do it. I assume you safely know how to elevate your vehicle and are aware of the power contained in the cars battery. I assume you know what a torque wrench is. Do not wear any jewelry, belt buckles and jeans with rivets. Moccasins are a nice replacement for shoes. When I ordered (6/96) VDO stopped making their night design model and went to their night vision model. The U shaped mounting brackets for these gauges are now optional and hard to obtain according to BMP. BMP recommends using silicone to mount the gauges. I found this to be unacceptable. Also, paint was flaking off two of the gauges. Here we go! I called BMP. They sent a UPS call tag for the entire package and replaced it with three U-bracket mounted gauges with paint intact. Although you don't really need the electrical manual, it is nice to have if you want to do it your way. You have to remove both under dash panels, drivers and passenger side, the passenger side kick panel (so you can pull back the carpeting) and the OBC in my case. If you can find another good ground and do not go to the dimmer switch, then the left under dash panel removal is not necessary. I also had the glove compartment removed for alarm installation. BMW now makes it so their fastening methods are not that obvious. Having the repair manual and parts u-fiche lets you learn how do take your car apart. I decided to take the car apart one time and install all the things I wanted :Stereo head unit/changer, rear fog, additional rear brake lights, rear wing, garage door control, under-hood light, chime volume control etc. Every time you take something apart you risk damaging it. After you do it, taking things apart is easy. Before you do it is the hard part. I mounted the gauges left to right alphabetically by width: oil pressure, oil temperature and voltmeter. Take the time to position them exactly relative to each other. BMP supplies caps for the gauge lamps to match the BMW orange lighting. It is slightly redder but acceptable. I then wired the panel. I used #14 gauge for the ground (brown) oil temperature sending unit (white) and oil pressure unit (blue). I used #16 gauge for the dimmer controlled lighting (yellow) and hot in accessory position (red) wires. What you end up with is the two sending unit wires exiting out the left of the panel and three wires exiting out the right looking at the unit from the rear. Make sure you use plenty of towels to protect the console area when moving things around. Another handy tool is a stainless steel pick. It's stiffness lets you remove switches and things without damage. The instructions from BMP and VDO are straight forward. I daisy chained one side of the three lamps using yellow wire and insulated push on female tab connectors and female tab connectors with a male tab which makes the daisy chaining easy. I daisy chained the plus terminal of each gauge in the same manner. I daisy chained the other contact of the three lamps and the ground contact of each gauge as well. There is not much clearance between the plus and ground terminal of each gauge. Make sure these points are insulated properly so they will not come in contact with each other when you install the panel and everything kind of moves around. Install the blue wire to the oil pressure gauge unit S terminal and the white wire to the oil temperature S terminal. You remove the OBC by inserting a 0.040 feeler gauge at the bottom of the unit, roughly an inch and a half in from the sides and lever out with the stainless steel pick. Remove the drivers and passenger side under dash panels by removing the screw caps and screws Pull drivers panel towards you and the door opening. From experience, if you do not cover the passenger side kick panel with tape you will definitely scuff it. Pull back the door opening trim in the area of the kick panel. Undo the slotted plastic fastener and remove the kick panel. Take care not to puncture the speaker. Disconnect the cigar lighter and its lamp and push out whatever switches you have. (heated seats ,stereo, etc.) from the original panel. Reinstall (being careful with the $200.00 panel) the cigar lighter and switches in the new gauge panel. Route the wiring through the opening where the new panel will go. The sending unit wires going to the engine compartment are going out the passenger side. When dressing the wires via ty-wraps, space them evenly and install in the same relative direction if this kind of stuff is important to you. Route, dress and connect (after you install the new panel) the ground wire (brown) using appropriate Stakon to the ground point at the left-side of the dash. It's the stud with all the brown wires going to it. Likewise, connect the dimmer controlled lighting wire (yellow) to the gray/red wire on the dash light dimmer control (It just pushes out from the rear) using tap-in connector. You could also pick up the gray/red wire from the cigar lighter lamp. Connect the hot in accessory wire (red) wire to the Harman Kardon spatial sound switch violet/white wire using tap-in connector. (This circuit feed is 5 ampere fuse F43) If you do not have this option select another wire that is hot in the accessory position of the ignition switch.(another good reason to have the electrical manual) Install the OBC or whatever you have. Sit back, put on your parking lights and see how nice everything looks. All three gauges should be illuminated. Vary the dimmer control and see if that happens. Put the ignition switch in the accessory position. Your voltmeter should be indicating ~ 12.6 volts. The oil pressure gauge should be at the maximum right hand position. The oil temperature gauge should be at the maximum left hand position. Although not necessary, ground the sending unit wires. The oil pressure gauge should go to the maximum left hand position and the oil temperature gauge should go to the maximum right hand position. GOOD JOB!!! You now have the two sending unit wires to get into the engine compartment. Pull back the passenger side upper right side carpet and you will see where the main power wires ((big red ones)(not the 1st Infantry Division)) go into the engine compartment. I snaked the sending unit wires through this point. The oil pressure sending unit mounts in place of the oil pressure switch which is mounted at the rear of the oil filter housing assembly. The oil temperature sending unit mounts in place of the oil drain plug at the right rear side of the oil pan. (left/right, front/rear is relative to you sitting in the cockpit) To install the oil pressure sending unit and route the wire remove the alternator cooling duct via the hose clamp at the alternator. When you reinstall at the press on end, (the end opposite the clamp end) make sure the lower flap enters the opening. Plug the hole at the alternator cooling duct inlet. If you don't, you will definitely drop something in it. Remove the air cleaner assembly via the two 10mm nuts and clips. Loosen and release the top oil filter assembly cap with a 36 mm socket (Installation torque value is listed on the cap.) The oil will drain into the sump. Now when you remove the oil pressure switch it will not drain elsewhere. Remove the oil pressure switch connector and remove the switch via a 24mm socket/wrench. Install the sending unit on to the adapter so that the terminals are perpendicular to the mounting bolt axis. Install the oil pressure sending unit/adapter assembly with the terminals facing up. The oil filter housing gets in the way if you face them down. I was unable to properly torque the sending unit adapter. There is no room for the torque wrenches I have. I torqued with a wrench and my experience. If you don't ever plan to remove this gauge package cut the plug off the oil pressure switch plug wire assembly, attach the appropriate Stakon type connector and connect to the sending units WK terminal. Be careful, the sending units wire mounting nuts like to fall down. I never did find one that fell. VDO sent me four replacements when requested. If you do want to preserve the connector, tap-in to the plug wire and attach to the sending unit. Torque the oil filter cap. Now we have to get the oil pressure sending unit wire from the right side to the left side sending unit. If you have other wires to run for other things you are doing , do it now. The first time took me two hours to get from the right to left side when installing my garage door opening control to make it look right. Depending on your standards you can do this many ways. This is how I did it. Proper dressing of the wires is assumed. Once into the engine compartment I followed the large red wire going up to the point where you jump start your vehicle. The oil pressure sending unit wire now goes along the finely ribbed tube going to the compartment above the rear of the engine. Entrance into this compartment is via the large ribbed rubber tube. Unsnap the compartment tabs. Take a 1/8 inch aluminum wire and route it through this tube. Tape the sending unit wire to this and pull it trough into the compartment. A long #2 Phillips screw driver is helpful in establishing this path. Exit out the other side using the same method. I ty-wrapped to the cruise control cable which goes down along the big red wire, I assume going to the starter. I then headed toward the installed sending unit and attached to the G terminal. Make sure you allow slack for engine torque movement. If you now start your vehicle the oil pressure gauge should indicate approximately 58 lb. cold and your instrument cluster oil pressure warning lamp should go out . Once warmed up (~10minute) the gauge indicates ~ 10 lb. at idle. With revs it approaches the 58 lb point. Undo the 17mm oil pan drain plug and drain the oil. Install the oil temperature sending unit in its place, torqueing to 15NM=11ft-lb. Do not get caught up in the moment. (REPLACE THE ENGINE OIL!!!). The oil temperature sending unit wire goes down along the right fender-well. Be aware of the exhaust header pipes. Slit the open end of the female tab connector insulation, or remove its insulation completely and attach to the sending unit wire. Connect to the sending unit. If you now start your vehicle do not be alarmed that the gauge looks like it is not working. It takes ~10minutes for the engine to warm up. (Interesting). Once warmed the gauge should indicate ~200 degrees. Replace the panels and stuff : Done! WHAT A DETAIL!!! The above is just a guide. Keep in mind if you do this with the battery connected you have to be extremely careful. I, first hook up my SEARS 8 ampere battery charger via my diode protected, fused remote charge hookup.(Will write this up, when I get a chance) I then disconnect the negative battery lead in the trunk. The charger keeps everything alive supplying enough current to accommodate door opening, interior lights etc. Now if you accidentally screw up, you limit the current flow to the charger output, or the fused amount. As always, feel free to do it your way.
Milos E36 325is: 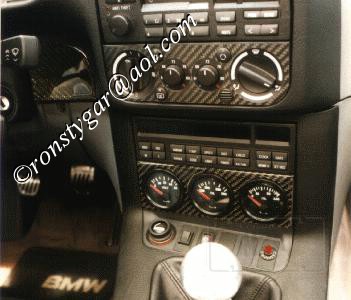
See Jim Powell's writeup_at_Susy's BMW Mpower site for details on installing the JTDesign gauge sender block. Here is another way to install sensors for cars with the M50/M52 or S50/S52 6cyl engine: 
|

