|
Ron Stygar Carl Buckland Dale Beuning Forums Help
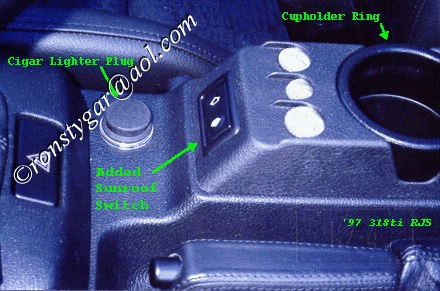
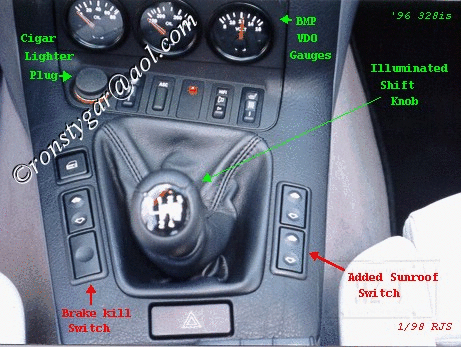
From RonStygar_at_aol.com Thu Dec 25 21:29:12 1997 From RonStygar_at_aol.com I find raising my hand to open and close the sunroof, somewhat awkward. The following describes how I eliminated this inconvenience on my '96 328is and '97 318tis. On the 328is, I mounted a second sunroof switch just below the passenger side window switch. You could also mount it just below the drivers side window switch. On my 328is that position is already taken by the brake light kill switch. To accomplish this you will need a double curved frame and an additional switch. On the four door cars (I'm guessing) you would use the triple curved frame. On the ti, I mounted a second sunroof switch on the sloped area just forward of the coin holder. To accomplish this you will need a single flat frame and an additional switch. In both cases you will have to route a small two conductor cable (current draw on each of the control lines is only 0.4 ma) from the added switch to the upper sunroof switch via the drivers side A-pillar. The cable I used has a 1/8 inch O.D.. Although the A pillar part appeared to be a monumental task, once I figured out how the mounting clips worked, it was a piece of cake. 
Photo 2 
     Pieces / parts: for the 328
                            Double curved frame 61 31 1 387 998 $1.60 retail
                            Switch 61 31 8 365 300 $39.40 retail
                            12 feet, two conductor cable
                            Triple curved frame 61 31 1 387 999 $3.18 retail
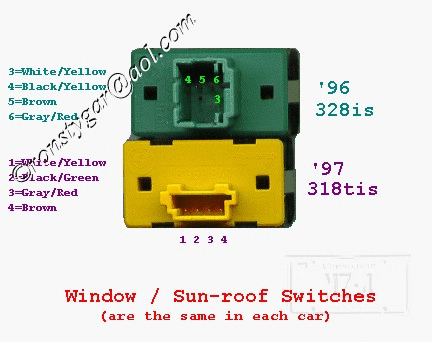
If you would like to save a few dollars, the switch for the ti would also work in the 328. I just wanted to keep things the same. After ordering the 328 switch and doing it, I would use the ti switch for both applications. Unlike the ti switch the 328 switch pins are recessed and are easily bent. I ended up cutting the plug housing flush with the base to salvage this switch. Live and learn. If you use the ti switch you will have to equate the pin differences between the two switches. This is obvious if you look at photo 1.
     Parts for the ti
                            Single flat frame 61 31 1 387 996 $1.45 retail
                            Switch 61 31 8 368 941 $31.95 retail
                            12 feet, two conductor cable
In both cases you will also need four female pins that fit the added switch male pins. I happened to have some gold ones. If you are unable to find some, keep looking. As a last resort, I will sell some of mine for $1.00 apiece. If you can acquire the BMW connector and pins, that would be the way to go. Here we go. The following is just a guide. As always, feel free to do it your way. Let's do the ti first. Remove the coin/cupholder assembly by undoing the two Phillips (+) screws. In the forward sloped section of this assembly create an opening to accommodate the flat frame and switch (See below, on how I did this on my 328). Take the time to center horizontally and vertically. Mount the flat frame. The switch mounts with the close button toward the drivers side (solid white arrow)(see photo 2). Drill a 3/8 inch hole in the area just below the added switch to provide a wire path. Pull up the shift boot by pressing in on the sides. Pull up the foam insulation piece. Tap in to any of the ground (brown) and the lighting (gray/red) wires in the console area. Remove the sunroof switch pulling out using your fingernail under the frame. Pull out the panel where this switch/frame was mounted. Note the wire color sequence of the brown and gray/red wires and with the same orientation duplicate these positions on the added switch (See photo 1). Solder the gold pins to the two added wires, shrink tube the pins and route the two wires from the console area up through the 3/8 inch hole that you drilled, and out the switch opening you created. Plug the two wires into the added switch taking care not to bend the male pins. Solder pins to the two conductor cable that will be going to the upper sunroof switch, shrink tube the pins and plug into the added switch. Remember which color you use for each pin so that when you tap into the upper sunroof switch wiring you know which color goes where. Route the cable through the 3/8 inch hole you drilled. Continue forward through the console along the left side toward the gas pedal area.

We now have to route this cable to the upper sunroof switch. On both cars, I routed this cable up to the sunroof switch via the drivers side A-pillar. The drivers side upper area provides more of an opening compared to the occupied (wires and sunroof module) passenger side. The panels on the drivers side (328) are also easier to remove and install. Remove the drivers side under dash knee panel. Route over the lower under dash panel over to the area below the A-pillar. Pull back the A-pillar rubber seal and pry out the Apillar upholstery. At the top, I used a putty knife to get it started. It just snaps right out. Putting it back (initially) was not that easy. Make sure the three (two on the 328) metal clips are spread apart enough to lock into the Apillar. Make sure the inner tabs on the clips are pushed in and touching. Push the three (two on the 328) clips back into the A-pillar. Remove the drivers side visor. Remove the visor mirror light from the headliner just like you removed the sunroof switch. Route the cable up through the side of the dash coming out at the base of the A-pillar. I ran the cable up the flat side of the A-pillar which faces the windshield, taping as I went. Pull back the headliner slightly and feed the cable over to the visor light opening. Continue over to the sunroof switch/map light opening. Tap into the upper sunroof switch open and close lines remembering which colors you used on the added switch. Before you put everything back together, check the sunroof operation. If it opens and closes properly, good job! Put everything back together. Adding the second sunroof switch to the ti came out really nice. That's where it should of been in the first place. Your hand just naturally goes there. For the 328 pull up the shift boot by pressing in on the sides. Pull up the foam insulation piece. Remove the window switch and single frame from the side you chose to mount the added switch. Elongate the chosen opening to accommodate the double curved frame (same width, ~3 1/4 inch length). I did this by marking the opening and prick punching a bunch of points along the inboard edge of the marked line using a spring loaded prick (center) punch. I then, using a small drill, drilled out the marked points. Cut out between the points with small cutters and a razor knife. File or Dremel tool to the exact size. Although tedious, on many applications, this method has always worked for me. From here on its basically the same as the ti. The 328 came out just as well. See photo 3. RonStygar_at_aol.com, FLY BMW-CT, FLI BMW-CT, BMWCCA 15924  Photo 4
|

