UnofficialBMW.com
Unofficial BMW

Unofficial BMW

Google Search


What's New

Search (Google!!)

FAQ

BulletinBoard

Classifieds

Garage

Images

Books

Tools

Parts

Used Cars

Links

FTP

Advertise

Search Amazon.com
In Association with Amazon.com
 

Home E12 E24 E28 E30 E34 E36 Z3 E39 E46 X5/E53 ALL
Ron Stygar Carl Buckland Dale Beuning Forums Help

Unofficial BMW Nav Map


From digest.v6.n157 Sun Feb 2 15:13:21 1997
From: RonStygar_at_aol.com
Date: Sun, 2 Feb 1997 02:03:19 -0500 (EST)
Subject: Lets rear fog plus my 96 328is

Adding rear fog/s to a 328is is not worth the effort if that is the sole desire. Adding rear fog/s, doubling up the brake lights and adding a brake light kill switch might be. If you do it in conjunction with the installation of your non BMW rear CD changer it is a given. The wiring, switch and connector pins are not present for the rear fog light/s on the USA 328is.


Rear Fogs Switch Doubling Brake Light


Parts required:

  • Dual fog light switch Part # 61 31 1 387 054 $33.02
  • Child safety switch (Kill switch) Part # 61 31 1 387 857 $29.75
  • Frame (For kill and window switch) Part # 61-31-1-387-998 $1.60
  • 8 each Female pins Part # 61 13 1 376 202 $1.17 For foglight switch, kill switch and brake light switch
  • 2 each Male pins Part # 61 13 1 376 191 $0.40 For brake light switch

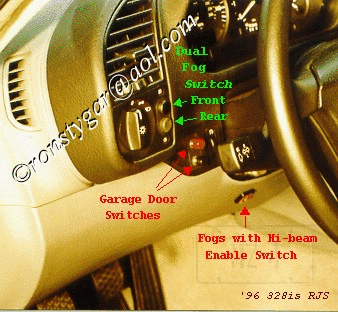
The kill switch is handy when parking with your sweetheart, listening to tunes. It is also handy when going by the authority and you want to reduce your speed, discreetly.

Doubling up the brake lights hopefully gets the attention of the mail readers and make-up artists.

The rear fog's makes you visible in the fog.

The rear tail light is a dual element lamp. The 5 watt element lights when you turn on you parking lights. The 21 watt section of the same lamp is not wired. The connector pin for this function is not there. The tab on the lamp assembly is there. Concerned about meltdown, I removed the tabs and soldered wires to them (This was not easy). You might be able to solder to these tabs without removing them. This is the rear fog additional brake light element/s lamp tab.

I mounted the kill switch directly below the left window up/down switch on the center console using the new double curved switch frame. If interested, I will E-mail you an attached PCX file of the schematic. For a hard copy send me a SASE. As always, feel free to do it your way. Lighting the dash instrument cluster rear fog indicator is still under investigation.

Ron Stygar
Marlborough, CT


                         by John Firestone
                 Copyright 1997 by John Firestone

Wie Nebel in Herbst - there are few places with so many cars that see such thick fog as Germany does on cloud-free Autumn nights - fog so thick that lowbeams are well nigh useless and seeing to the edge of the road becomes a challenge. On such nights, the problem, however, is not seeing but being seen. Every year there are massive pile ups because someone could not see the car or truck in front of them in time.

Rear fog lights are standard equipment throughout Europe where they are considered more important than front fog lights for safe driving in the fall and winter months. They are a somewhat drastic, last-ditch measure against being rear ended when the visibility becomes extremely bad (less than 50 yards) because of fog or snow. While most parts of the United States rarely see fog thick enough to need them, some parts do. In this article, I describe how I enabled the rear fog lights on a U.S. market '96 318is to increase my safety during its first year in Germany.

U.S. market E36 3ers use their own wiring harnesses, switches, relays and instrument clusters that delete almost all the contacts, wires, lamps and fuses needed for rear foglights. These things are not difficult to retrofit but the job can be a bit tedious. You will need to run wires from the fusebox to the back of the car, which probably will mean lifting the driver's side carpeting. You may need to do this anyway, if you are upgrading your sound system, for example. Adding rear foglights might not be much more work.

I will assume your car already has front foglights and that you have access to a good self-repair car manual, such as the E36 manual from Haynes. I will add details not given by Haynes. To enable rear fog lights, you will need the following parts:

  • four fuse strip/relay contacts
  • a 7.5 A fuse
  • some 0,75 mm^2 and 0,5 mm^2 wire
  • a two button foglight switch
  • a 12 volt indicator light (yellow recommended)
  • five 2,5 mm round female contacts for 0,5-1,0 mm^2 wire, P/N 61 13 1 376 202 [strip of 25]
  • one 2,5 mm round male contact, BMW P/N 61 13 1 376 202 [strip of 25]
  • a pair of white "European" rear turn signals -ora couple of connector pins pulled from an old rear lamp cluster
  • zero to two green, two-output headlight relays, P/N 61 36 8 353 447, depending on the number already in your car (more anon).

PROCEDURE

There are enough things to disassemble and enough parts to remove that you may wish take notes and save parts as they come out in manilla envelopes. Anything that accepts electrical contacts - a connector, a fuse clip or a relay socket - also has a contact retaining rod or contact retaining shell which you must first remove before you add a contact. Do not forget to do this. If there is a retaining shell, make sure to first remove the shell and thread the contact and wire through it *before* inserting the contact into the connector.

To begin, read out any DME fault codes and then disconnect battery.

  1. Connect the foglight and headlights relays to fuse F17.
    1. Construct a Y-cable with a common fuse strip contact and two 30 cm
      (one foot) branches with fuse strip contacts at their ends.
    2. Open the fuse box and remove the four Torx 10 screws holding down
      the top of the fuse box.
    3. Remove the fuses to the left of fuse position 17.
    4. Lift out the top of the fuse box to expose the wiring underneath.
    5. Remove the fuse strip holding fuses 11-20. There is a locking clip
      at one end that you push inward. Do this and then push the fuse clip downward and out of the fuse box.
    6. The fuse block should have a white contact retaining rod with an
      obvious lever you need to pull. Don't. You will likely break it. Instead, using a jeweler's screw driver, first press in the small, white nubbin at the other end to pop out the lever, then pull out the retaining rod.
    7. Push the common fuse clip contact into one side of the fuse F17 until
      it clicks into place. It should go in easily.
    8. Remove the foglight relay, K47, and headlight relay, K48. These are the
      second and third relays in the middle row of relays. Unclip and remove their sockets' white plastic relay guide / contact retainers.
    9. Push the other contacts into the center terminals of sockets K47
      and K48. They should go in easily.
    10. Replace the white plastic relay guides. Re-insert K47 and K48 if they
      have a fifth center contact. Otherwise, swap them for green relays that
      do (cf. the parts list).
  2. Wire fuse F17 to the passenger compartment foglight switch.
    1. Remove the 2-3 screws fastening the driver's side kickpanel
      (lower facia panel) (Haynes 28.9). Slide out the doorward side of the
      panel until it unclips, slide the panel downward and out.
    2. Unscrew and remove the diagnostic socket at the back bottom of
      the U.S. knee protection panel you have just exposed.
    3. Remove the three bolts holding the U.S. knee protection panel;
      as the panel comes free, unplug the connectors to the
      ignition key and seatbelt reminder chimes.
    4. Cut off a 1.5 m of 0.75 mm^2 wire (ideally yellow/violet) and
      attach a fuse contact to one end.
    5. Using a tape covered screwdriver, scrunch a hole along the side
      of the wire bundle exiting the rear of the fusebox and entering the
      passenger compartment.
    6. Push the bare end of the wire along the side of the bundle;
      when you can reach it from the other side, pull the wire into
      the passenger compartment.
    7. Push the contact on the other side of the wire into the free
      side of fuse F17.
    8. Replace the fuse strip contact retainer, push the fuse block
      back in, replace the fuses, and insert a 7.5 A fuse into
      position 17.
    9. Slide out the foglight switch by reaching up behind the dash,
      and squeezing it at the sides (Haynes 12.20). Unclip it from
      its connector.
    10. Route the wire to the foglight switch, following the existing
      cables. Tie it along the way with cable ties or pushing it
      under the lacing where it looser.
    11. Cut the wire to match the others going to the foglight switch.
      Allow enough slack to install and remove the foglight switch
      and attach a 2.5 mm round female contact to the wire.
    12. Find the detent that fits a small hole in the foglight switch
      connector contact retaining shell. Using a
      knife blade or a small jeweller's screwdriver gently pry the
      shell away from the bump and slide it off, up the wires away
      from the contacts.
    13. Thread the wire from the fusebox through position four of the
      contact retaining shell and insert it into the foglight connector. It
      should click easily into place.

If you can find an existing cable that runs from the dash to the rear of the car, you may skip the following steps which are rather involved and took me a couple days to do. (I was also installing electric rear vent windows).

3. Remove the front seat and seat belt.

4. Remove the rear seat.

5. Remove the hood release lever and its speaker cover (first half

of Haynes 11.9). Note the slot receptable in the carpet that the speaker cover plugs into. Remove the the round screw knob that holds down the carpet near the gas pedal.

6. Remove the side trim strips.

Carefully unclip the trim strips from the rear door sill (if you have a four door car) and the front door sill (Haynes 26.3 and 26.4) The trim strips may pull straight out. Alternatively, if you have a coupe with a single long strip (such as the author's '96 318is), you may need to lift the back of the trim strip up, off and a plastic disk and then move it out and back down. The entire strip will then slide toward the front of the car and come free. If this is the case, you will later need two people to reinstall the trim strip.

7. Remove the driver's side rear seat bolster (Haynes 11.26)

8. Wire the foglight switch to connector X13.

  1. Pull back the carpeting in the driver's footwell to reveal X13, a
    coupled pair of hunky, black 30 pin connectors..
  2. Move the slide on the side of one of the connectors until they
    come apart.
  3. Separate the connectors and slide each connector's contact
    retainer shell away from its contacts.
  4. Following the existing cables where possible, lay out an 0.75
    mm, preferably yellow/white wire from the female connector to
    the fog light switch connector. Crimp a female 2.5 mm round
    contact on each end, thread the ends through the
    contact retainer shells at the correct positions and then insert
    the contacts into position 5 of the female X13 connector and
    position 3 of the fog light connector. Slide the corresponding
    retain shells back onto their connectors.
  5. Decide where you will put the rear fog light in-use indicator.

Given how obnoxious rear fog lights are to other drivers, it is important that they have an obvious indicator light to remind the driver to shut them off once they are no longer needed. The rear fog lights have their assigned indicator in the instrument cluster. This is probably the best of all places to add one, except for three complications. To remove the instrument cluster, you must first remove the driver's airbag and steering wheel. This is not the most agreeable task and if done terribly wrong it is dangerous. The instrument cluster connector also requires a special contact that is part of a BMW in-house repair kit. This may mean having to buy a whole kit of contacts rather than just the one you need. Finally, many U.S. market instruments clusters have the yellow, rear foglight pictogram blacked out.

If you really must have the indicator where it was intended to be, you will need a contact from packet H of Parts Kit IV for On Board Electronics (an parts kit for BMW mechanics), and a 1.2W indicator lamp, P/N 62 11 1 368 299. If your instrument cluster has a blacked out pictogram (it should be just right of one for the front fog lights), you might mask out an aperture hole at that spot, carefully remove the paint with a cotton ear swap of solvent, and then solder in a high-brightness yellow LED connected to a 680 ohm resistor. Alternatively, the really adventurous might swap in an Australian or U.K. market instrument cluster....

That said, it is probably easier to mount the indicator light in one of the spare plastic panels on the center console just in front of the gear shift lever. These pop out which makes for easier machining.

10. Run wires to the rear fog lights.

  1. Unhook the back of the driver's side carpet from the rear reat riser
    and lift up the carpet along the driver's side of the floor, to
    reveal a square plastic conduit covering cables running from the
    front of the car toward the rear. Open the trunk and pull back
    the carpet along the driver's side wall of the trunk to gain
    access to the cable route as it enters and passes around the trunk.
  2. Lay out one 0.75 mm and one 0.5 mm, preferably yellow/white wire
    from nearly the driver's side rear lamp cluster to the foglight
    switch connector. Extend the 0.5 mm wire beyond the foglight
    switch so that it reaches the indicator light.
  3. Route the 0.75 mm wire to connector X13. Crimp on a male 2.5 mm
    contact, thread it through the proper position of X13's contact
    retainer shell and insert the contact into position 5 of the
    male X13 connector. Slide the contact retain shell back onto
    the connector and push the two X13 connectors back together.
  4. Remove the connectors from the two rear lamps clusters. Slide
    back their contact retaining shells.
  5. The loose ends of the two wires from the front of the car, will
    become a solder junction, X1214, with the wires to the rear
    foglights. Find an easily accessible place to tuck these wires
    with some slack to make it easy to get to the junction.
  6. Route an 0.75 mm wire from the junction to the driver's side
    rear lamp connector.
  7. Route a 0.5 mm wire from the junction to the passenger's side
    rear lamp connector. There is a slightly destructive but
    correct way of doing this which is to punch out the center pins
    of the studs holding down the trim strip running along the spare
    tire well from the
    one lamp cluster to the other and then pull off the strip.
    Then there is the hack electrician's way which is as follows.
  8. Remove the two plastic nuts that holding down the flat plastic
    floor panel kitty-corner from the battery.
  9. Remove the battery cover/first aid kit tray if you have one.
  10. Gently pull out the bottom of the trim strip near the battery
    and thread the cable from the passenger side rear lamp connector
    into the spare tire well. Follow the cable running underneath
    the trim, staying inside of the plastic stud.
  11. Gently pull the left mid-section of the trim-strip then the right
    and thread the wire underneath the trim and above the two
    bottom spring clips.
  12. Gently pull out the bottom of the trim strip near the driver's
    side rear lamp cluster and thread the wire upward, staying inside
    of the cable until the wire reaches the left lamp cluster.
  13. Pull out the bottom of the moulding, first one side then
    the other and very gently tension the wire so that it rises up
    inside the trim strip.
  14. Wrap and solder insulate the 0.5 and 0.75 mm wires from the rear
    lamp clusters with the two wires from up front, to form junction
    X1214. Insulate the junction.
  15. Crimp 2.5 mm diameter female contacts onto the wires running to
    the rear lamp clusters, feed the contacts through the correct
    positions of the contact retainer shells.
  16. If you have a 4-door, on the driver's side, insert the contact
    into pin 1, and on the passenger's side, into pin 6.
    If you have a 2-door, on the driver's side, insert the contact
    into pin 3, and on the passenger's side, into pin 7.
  17. Slide the retaining shells back on.
  18. Hook up the rear fog lamp indicator.
      Connect the 0.5 mm rear foglight wire to indicator lamp. 
      Connect the other side of the lamp to the nearest ground lug 
      using a 0.5 mm brown wire.

12. Modifying the rear lamp clusters.

If you have wanted to and have not already, you might take this opportunity to replace your rear lamp clusters with white, "clear European" turn signals. These have rear fog lamps that work. If you have stock U.S. rear lamps, you are almost there. You just need to add the missing pins for the rear fog lamps.

If you have a helpful BMW dealer, ask them to give you a damaged rear lamp cluster which you can salvage for pins. Between accidents and water-loggings, you may not have to wait long. There appear to be two types of rear lamp clusters: an old style which had a removable foil and plastic circuit board and the current style which has foil traces tack-glued to the housing. If you have either style, you should be able to solder and epoxy in the missing pin. You may have to first drill out the corresponding pin if you are fitting pins from one style into the other.

If you have the new style, it is pretty easy to pop off the main plastic shroud and fully expose the pins. Using a knife, pry off the mushroom heads (leaving the stems) that are holding down the plastic connector shell. The shell is otherwise free to move. Remove just enough so that you can pull off the shell. After you put the shell back on, scratch the stems and the plastic around them, mix and apply some two part epoxy, let it set then harden it in an oven at 70 deg C for a couple hours.

13. Once everything is tested and found to be in order. Put the car back together in the reverse order you took it apart. The tightening torque on the seat belt and seat related bolts is 45 Nm.

Unofficial Homepages: [Home] [E12] [E24] [E28] [E30] [E34] [E36] [Z3] [E39] [E46] [X5/E53] [ALL] [ Help ]