|
Ron Stygar Carl Buckland Dale Beuning Forums Help
From RonStygar_at_aol.com Tue Mar 3 00:47:30 1998 The following, how to, describes how I added additional trunk lighting to my '86 325es and '96 328is. While you have it apart you could also double up the brake lights. If you are going to do that, you might as well also add the rear fog function. I initially performed this modification on my '86 325es. On this car the cutout for the second lamp assembly is all ready there. You simply add the second lamp assembly and daisy chain the existing wiring going from the stock lamp to the added lamp. The two lamps are wired in parallel. That's it. On my E36, I basically duplicated the trunk lighting that is standard on the E36 convertible. The convertible has a trunk light lamp assembly mounted on each of the main lamp assemblies (tail, brake backup light etc.) cover. You will have to create an ~1 inch by ~2 3/8 inch rectangular opening in each cover to accommodate the added trunk light lamp assemblies. You will also have to tap into a hot at all times + wire and the switched ground from the trunk light switch. The following is just a guide. Read it completely prior to attempting this modification. As always, feel free to do it your way. Here we go: Pieces/parts E36:
        2 each Lamp Assembly 63 31 1 378 089 $5.37 each retail
        2 each Lamp 07 50 9 063 577 $1.30 each retail
        4 each red (22-18ga) 1/4 inch female tab connector NAPA 784287 $0.95/8
or
        4 each blue (16-14ga) 1/4 inch female tab connector NAPA 784294 $0.95/8
        2 each red (22-18ga) 1/4 inch female/male daisy chain tab connectors NAPA  784288 $0.95/4 or
        2 each blue (16-14ga) 1/4 inch female/male daisy chain tab connectors NAPA 784295 $0.95/4
        12 ft 18 ga. red hookup wire. I used NAPA # 785302 (18ga), 45 feet $4.29
        6 ft 18 ga. brown hookup wire. I used NAPA # 732401(16ga), 100 feet $11.40
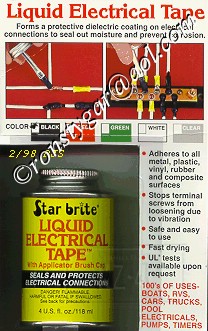
E30: Some of the above (2 daisy chain and four tab connectors), half the BMW stuff and 2 foot of each wire color. You will also need tywraps and the parts for the means of tapping into existing circuits that you use. I remove a small ring of insulation and attach/solder the new wire to it. I seal the junction using Star brite liquid electrical tape. This is available from NAPA in a 4 ounce can # 765-2950 for $5.99.
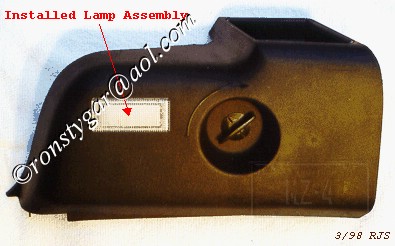
The simple procedure for doing this on an E30 is described below. Remove the stock lamp assembly and unplug its wiring. The lamp assembly just snaps out using your fingernail or screwdriver. Connect a red and brown wire to two separate daisy chain connectors. Run the other end of these wires up through the stock lamp assembly opening and over to the added lamp assembly opening. Plug the two daisy chain connectors into the stock lamp assembly. Reconnect the stock wiring to the male tab of the daisy chain connectors. Reinstall the stock lamp assembly. Crimp two female tab connectors to the added wiring coming out of the new lamp assembly opening. Plug them into the added lamp assembly and push the lamp assembly in place. That's it. Check out as below. I do not know which fuse applies to the E30. The car and manuals are gone. On the E36 remove the two main lamp assembly covers. If your not sure on how to do this, it is in your owners manual. Make up a template out of paper or whatever to accommodate the lamp assembly ~1 inch by ~2 3/8 inch size. I used vinyl shim stock. You do not want the hole any larger than this, so make the template accordingly (which means, make it smaller than the desired opening). Look at the inside of the main lamp assembly cover. Where the BMW logo, part # and date of manufacture information are embossed, is where the new lamp assembly will be mounted.
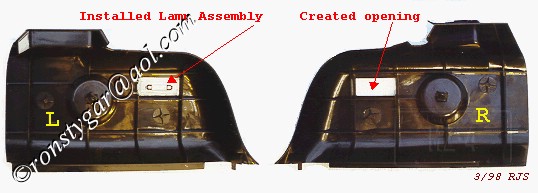
You have to notch out the vertical divider of this area (the one closest to the cover fastener in each case) (the lamp covers are mirror images of each other) to accommodate the 1/4 inch tab connections. I did this by cutting the marked vertical lines in this divider using my miniature 4 inch diagonal cutters. Do not notch out to the bottom. Leave ~3/16 inch to lock in the lamp assembly. You can then using lineman's pliers grab at the proper point and snap out your notch going back and forth until the material breaks away. Much easier then it reads:). Position (center favoring the notched out side) the template you made in the opening. While holding it in place, mark the four corners adjusting for the drill size you will use. I used my automatic prick (center) punch. Drill the four marked points. Turn over the cover and connect the drilled holes. I used a stainless steel scribe. You now have the opening marked. Drill a series of holes along the inside edge of the marked lines. Holding a 1/4 inch wood straight edge along the line keeps the drill from wandering out of the area. Cut between the drilled holes using the diagonal cutters and/or a razor knife. Hand file the opening to the ~1inch by ~2 3/8 inch size, test fitting the lamp assembly as you go. This will ensure a nice fit.
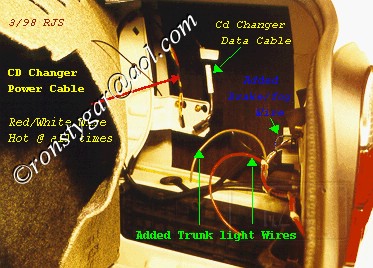
I paralleled the existing trunk light wiring. I picked up the switched ground brown/white wire in the drivers side rear lamp assembly area. Follow the wiring coming down from the trunk lid, following it into the trunk.
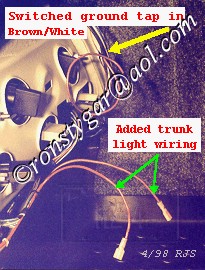
You could tap into the hot at all times red/white wire in the area of the drivers side rear speaker where it comes down from the existing trunk light. Since I have a SONY changer, I tapped into the BMW changer wire. This is located on the passenger side, behind the carpet like trim, just above the battery.
Tap in to these wires and run them to the respective side lamp cover area. Take care not to short the hot at all times wire to ground or remove the fuse associated with the tap in point. In my case that was 10A (red) fuse # 33. I found this out after I blew it. The added wires will go between the drivers and passengers side rear lamp assembly areas (why the chicken crossed the road). Pull up the trunk weather stripping, starting at each side of the lower portion of the opening. Run the two (three if your adding the fogs and doubling up the brake lights) wires in the cavity created by removing the weather stripping. Pry up the plastic trim strip using your fingers and position the added wiring just forward of the three plastic vertical tabs. Replace the weather stripping. Dress and connect the hot and ground wires you tapped into to the respective sides (if you tapped into the areas I did) using the 1/4 inch daisy chain connectors to one side of each lamp. From each of these daisy chain connectors, connect the appropriate wire to it (brown) on the drivers side (red) on the passenger side and daisy chain over to the other side via the added wires. Install the rear lamp assembly covers. Replace the fuse if you chose to remove it. If the added lamps light up, its a good sign. If they don't, check the fuse if you didn't remove it or reread the above. Press in the trunk lid lamp switch. If the lamps go out, good job! If your wondering if the lights really go out when you close the trunk, you can open one of the fold down rear seats, if you happen to have them, and check.
Ron_at_unofficialbmw.com, FLI BMW, FLY BMW, Marlborough, CT |

